Making Basic Viewer Extension
Making Basic Viewer Extension
To create a basic extension, go to the API section of the website and click on "Resources for developers".
Find the title "Github" on the page and click on the first link "Materials and demo apps for developers":
On the new page, click on the "Code" button and select "download ZIP" in the pop-up window:

Note: you can download the repository in any convenient way.
Run the project
In the project tree, find the file "package.json", run dev script in it. The project will run on a local server on 3000 port :
//package.json
{
...
	"scripts": {
		"serve": "vite serve",
		"dev": "vite",
		"build": "vite build --emptyOutDir"
	},
...
}
Note: all the projects run on 3000 port.
After downloading the archive, you need to unpack it and open the project using your IDE. The folder named "extensions" is located in the path tangl-demo-playground->src->extensions:
[tangl-demo-playground]
  [src]
    ...
    [extensions] //all extensions folder
    ...
Creating extension folder
Go to the extensions folder and create a new folder with the name of your extension.
This example creates a project with the name test-basic
[tangl-demo-playground]
  [src]
    ...
    [extensions] //all extensions folder
      [test-basic] //extension folder
    ...
Creating a main extension file
Create an index.ts file in the new folder:
[tangl-demo-playground]
  [src]
    ...
    [extensions] //all extensions folder
      [test-basic] //extension folder
        index.ts //main extension file
    ...
This file will contain all the logic of the extension.
The simplest example of a file to create an extension looks like this:
Each extension is a class inherited from the Extension Base.
First, import the ExtensionBase:
import {ExtensionBase} from "tangl-viewer";Then create class that extends ExtensionBase and prescribes a method for obtaining an extension name and define constructor:
import {ExtensionBase} from "tangl-viewer";

export class TestExtension extends ExtensionBase {
  static getName = (): string => "test-basic"; //contains the name of the extension

  constructor(viewerName: string) {
    super(viewerName);
  }
}
Adding hooks
We also need to add two mandatory hooks of the extension lifecycle.
Hook when extension is added to ExtensionManager. It is called by ExtensionManager.addExtension():
 added(): void {
 }
Hook when extension is deleted from ExtensionManager. It is called by ExtensionManager.clear():
 deleted(): void {
 }
The minimum code for the extension turned out to be as follows:
import {ExtensionBase} from "tangl-viewer";

export class TestExtension extends ExtensionBase {
  static getName = (): string => "test-basic"; //contains the name of the extension

  constructor(viewerName: string) {
    super(viewerName);
  }

  added(): void {
  }

  deleted(): void {
  }
}
Registering an extension
In order for the extension to be embedded in the viewer, it must be registered. Extensions are usually registered after initializing the Render Manager.
In our demo application, this happens in the Viewer.vue file in the views folder.
[tangl-demo-playground]
  [src]
    ...
    [views]
      Viewer.vue
    ...
Registering an extension:
renderManager.init("viewer");
...
renderManager.extMan.addExtension(TestExtension)
...
Adding a UI to the toolbar panel
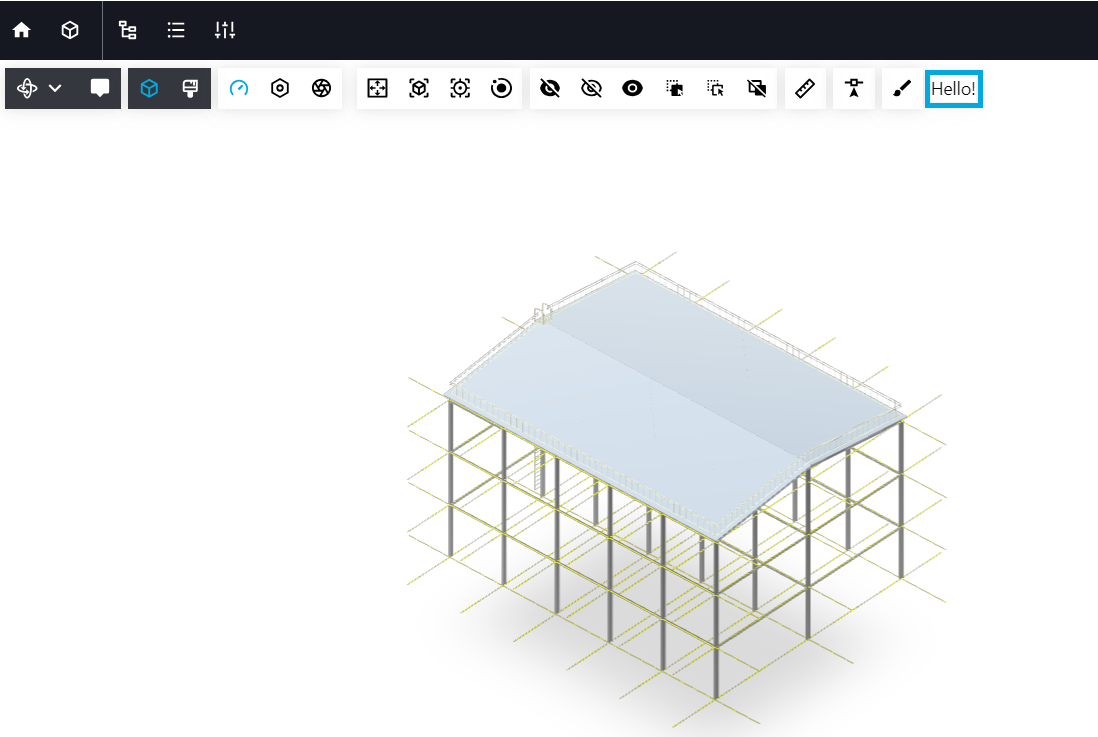
On the viewer panel, the extension can add any UI (button, labels, etc.) Let's add a simple hello label.
To display "Hello!" on the toolbar, you need to add render function for rendering shared toolbar content:
 sharedToolbarRender(container: HTMLElement) {
  const textElement = document.createElement("div");
  textElement.innerHTML = "Hello!"
  container.appendChild(textElement);
}
Adding minimal functionality
In order for our extension to do something, we will add minimal functionality to it. For example, we implement the function of painting model elements when clicking on them.
Getting a render manager
To manage all the functions of the viewer and its managers, we will need an instance of the RenderManager object. In the extension, it can always be obtained through a special function:
const renderManager = this.getRenderManager();
Subscribing to events
We will need to track the moment of clicking on the model element. To do this, we can subscribe to the corresponding event in the added hook and unsubscribe from it in the deleted hook:
import {ExtensionBase, RenderEvents} from 'tangl-viewer';

export class TestExtension extends ExtensionBase {
  static getName = (): string => "test-basic"; //contains the name of the extension

  constructor(viewerName: string) {
    super(viewerName);
  }

  onClick() {
  }

  added(): void {
    const renderManager = this.getRenderManager();
    this.onClick = this.onClick.bind(this)
    renderManager?.addEventListener(RenderEvents.Click, this.onClick)
  }

  deleted(): void {
    const renderManager = this.getRenderManager();
    renderManager?.removeEventListener(RenderEvents.Click, this.onClick)
  }
}
Coloring of elements at a click event
To paint an element by clicking, we get an instance of the render manager, the element number under the mouse. Generating a random color. We change the state and color of the element by its number:
import {ExtensionBase, ElementState, RenderEvents} from 'tangl-viewer';
import {Color} from "three";
...
onClick() {
const renderManager = this.getRenderManager();
//if hoveredElNum (the number of the element
// that the cursor points to) is equal to -1
// or is Active is false, then the function
// completes its execution
if (renderManager.hoveredElNum == -1 || !this.isActive) return;
//Creating a random color
const randomColor = new Color(0xffffff).setHex(Math.random() * 0xffffff);
//setting random color
renderManager.sceneManager.tools.setElementsColor([renderManager.hoveredElNum], randomColor.getHex())
//setting normal state for the element
renderManager.sceneManager.tools.setElementsState([renderManager.hoveredElNum], ElementState.Normal)
//request to redraw the frame
renderManager.requestUpdate();
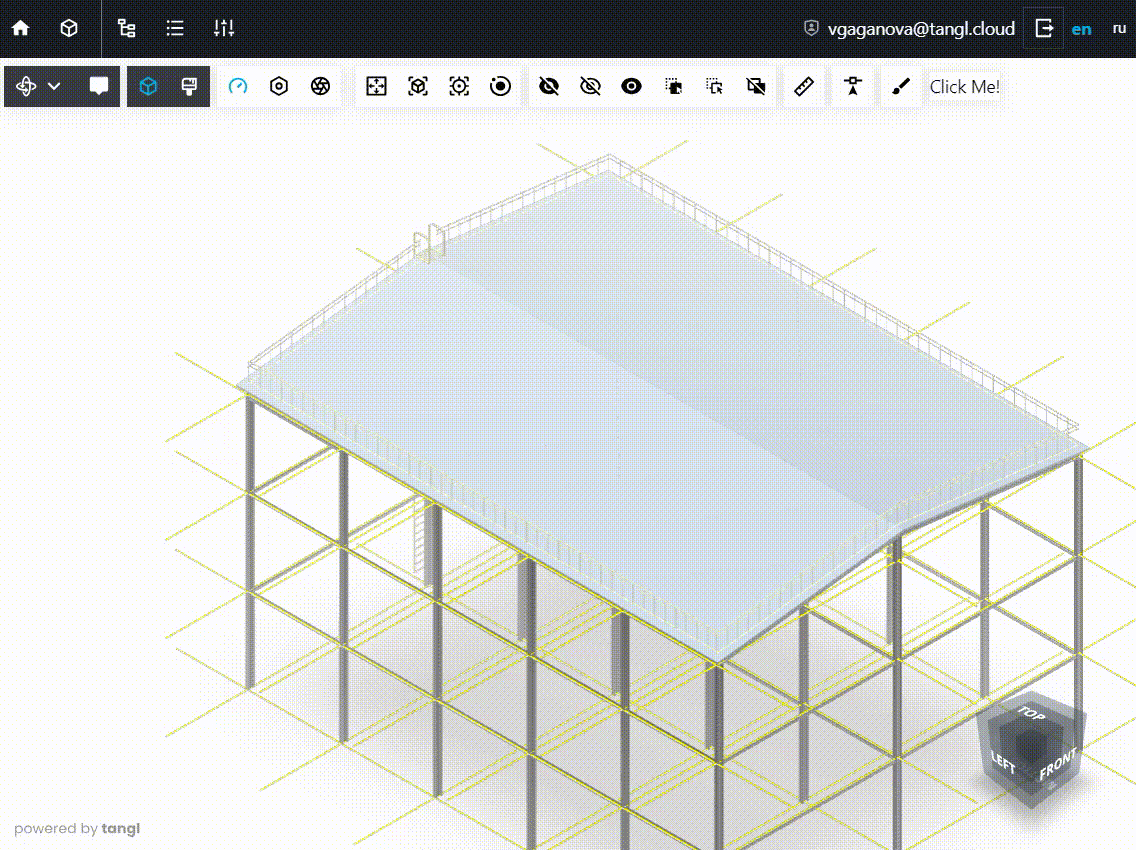
}Adding a button to the viewer toolbar panel
Add logic of enabling and disabling functionality by button via flag to control extension active mode:
export class TestExtension extends ExtensionBase {
...
isActive: boolean = false;
...
}
Adding a button with text with "click" event listener:
sharedToolbarRender(container: HTMLElement) {
  const button = document.createElement("button");
  button.innerHTML = "Click Me!";
  button.addEventListener("click",()=>{
    this.isActive = !this.isActive;
  });
  container.appendChild(button);
}
The overall file now looks like this:
import {ExtensionBase, ElementState, RenderEvents} from 'tangl-viewer';
import {Color} from "three";

export class TestExtension extends ExtensionBase {
   static getName = (): string => "test-basic"; //contains the name of the extension
   isActive: boolean = false;

  constructor(viewerName: string) {
     super(viewerName);
  }

  sharedToolbarRender(container: HTMLElement) {
    const button = document.createElement("button");
    button.innerHTML = "Click Me!";
    button.addEventListener("click",()=>{
      this.isActive = !this.isActive;
    });

    container.appendChild(button);
  }

  onClick() {
   const renderManager = this.getRenderManager();
   if (renderManager.hoveredElNum == -1 || !this.isActive) return;
   const randomColor = new Color(0xffffff).setHex(Math.random() * 0xffffff);
   renderManager.sceneManager.tools.setElementsColor([renderManager.hoveredElNum], randomColor.getHex())
   renderManager.sceneManager.tools.setElementsState([renderManager.hoveredElNum], ElementState.Normal)
   renderManager.requestUpdate();

  }

  added(): void {
    const renderManager = this.getRenderManager();
    this.onClick = this.onClick.bind(this)
    renderManager?.addEventListener(RenderEvents.Click, this.onClick)
  }

  deleted(): void {
    const renderManager = this.getRenderManager();
    renderManager?.removeEventListener(RenderEvents.Click, this.onClick)
  }
}
And this is how the extension works: